
This article will help you walk through setting up automation with the CRM PaintScout.
Click Here to Schedule an Integration Appointment with Our Team
SendJim does not have a direct integration with PaintScout so you will need a Zapier account to set this up.
Depending on the complexity of the Zap you are creating you may or may not need a paid Zapier account. If you have any questions on this, please reach out to our support team.
Connecting PaintScout with Zapier
- To connect your PaintScout account with Zapier, you first need a Zapier account.
- Log in to Zapier
- Click the My Apps section on the right and then Add Connection

- Search for PaintScout. Make sure to use the newest version (highest number) and select it. You'll then need to log in to your PaintScout account.
Triggers vs. Actions
- Using Zapier, you can set up PaintScout as a trigger or action.
- Trigger: A trigger is an event that begins your Zap (i.e., something happens in PaintScout first, that triggers an action in another software)
- Action: Actions are events that happen after you trigger, thus completing the zap (i.e., something happens in another software that triggers an action in PaintScout)
- For automation with SendJim, PaintScout will be the Trigger
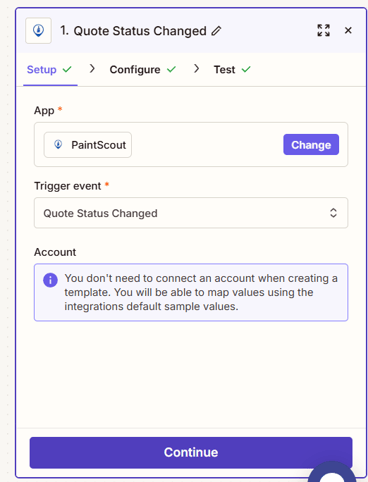
PaintScout as the Trigger
- If PaintScout is the Trigger, you must decide from the following options:
- Contact Created (triggers when a contact is created)
- Quote Status Changed (triggers when a quote status has changed)
- Invoice Status Changed (triggers when an invoice status has changed)
- Invoice Additional Work Accepted (triggers when additional work is accepted on an invoice)
- Quote Additional Work Accepted (triggers when additional work is accepted on a quote)
- Invoice Sent (triggers when an invoice has been sent, or re-sent)
-
Quote Sent (triggers when a quote has been sent, or re-sent)
-
Quote Tag Added (triggers when a specific tag has been added to a quote)
-
Quote Tag Removed (triggers when a specific tag has been removed from a quote)
-
Invoice Tag Added (triggers when a specific tag has been added to an invoice)
-
Invoice Tag Removed (triggers when a specific tag has been removed from an invoice)
We will use when Quote Status Changed as an example:
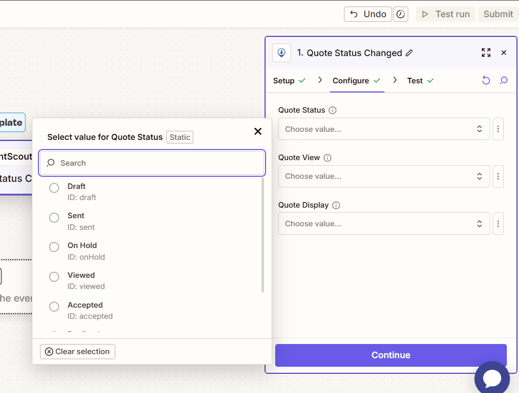
- Once you select the Trigger step, you will then Configure it:
- We've Chose when the Quote Status is "Accepted" but you can choose the status that works best for you.
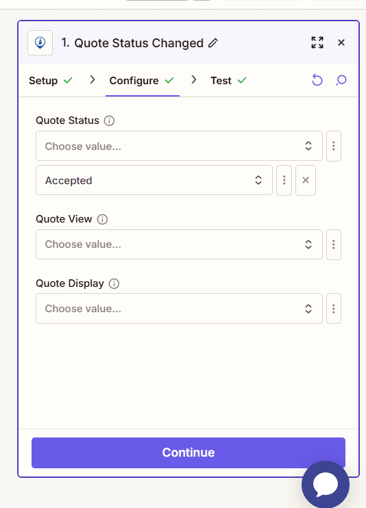
- Click Continue at the bottom, Test Step then Continue again
Once your PaintScout Trigger is set up, you can select another software as the action.
- Search for SendJim. Make sure to use the newest version (highest number) and select it. You'll then need to log in to your PaintScout account.
- For the SendJim Action Event, you have 3 choices:
- Choose Template (To mail something directly to an individual such as a customer or lead based off your Trigger step above)
- Create Contact (To add this contact into your SendJim My Addresses but NOT mail anything)
- Send Neighbor Mailing (To mail to the neighbors around your customer based off your Trigger step above)
- For the SendJim Action Event, you have 3 choices:
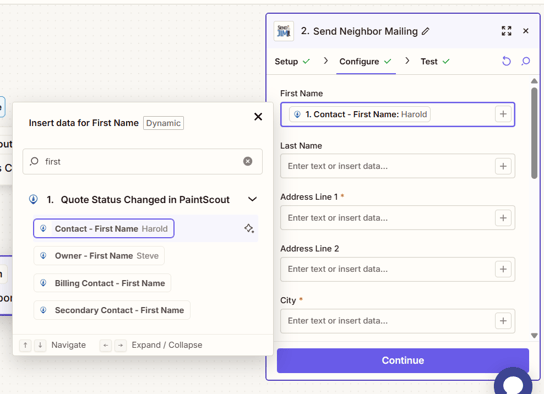
We will use when Send Neighbor Mailing as an example:
- Choose your Action step and click Continue

- Under the Configuration tab you need to map your information. This is when you tell SendJim where to pull the customer's information from in PaintScout.
- Click the + in the First Name box. It will then bring up the information being brought over by the Trigger step. Either use the Search box at the top to find the First Name field or scroll until you locate it. Then just click that field.

- Continue mapping the information (Street Line, City, State and Zip are the only required filed, all others are optional)
- After all the contact information is mapped, you will need to fill out the following:
- Number of neighbors to mail (how many neighbors around your customer do you want to mail to)
- Same street only: True or False (would you like to ensure anyone being mailed to is on the same road as your customer triggering the mailing? Please be sure this makes what you set in your SendJim Company Profile)
- Template (Which Template from your SendJim account do you want to send out. You NEED to have the Template created and saved in your account before setting up automation)
- Tags (Would you like the customer who triggers the mailing to get tagged. Whenever a mailing is triggered, the contact it was triggered based off of will have their information sent to your SendJim My Addresses automatically. You can choose to have a tag added as well)
- You will also see an option for "Trigger Frequency". This allows you to prevent the same recipients from getting the same mailing within the timeframe you choose

- You can choose from the following options:
- Always Send
- 1 Day
- One Time Only
- 1 Week
- 1 Month
- 6 Months
- 1 Year
- Click Continue once you are done with the Configuration
Testing The Automation
- Before you click Test Step in the Zap, be sure to go into your SendJim account and set up your CRM settings.
-
Set your monthly automated budget in your Billing and Membership section. These numbers are what SendJim will use to give Zapier a budget to spend every month. Once these numbers are set, click "Save."

-
Enable Auto-Replenish: This is the number of additional credits that SendJim can purchase on your behalf if you have run out of available credits, but have not reached your monthly spending limit
-
Maximum Monthly Spending Limit: This is the maximum number of credits that Jobber can use to send automated mailings on your behalf during the calendar month.
-
- Click Test Step in the Zap. It should then trigger a mailing to ensure the Zap is working correctly.
- If you do not want that test mailer to go out, please go into your SendJim account then your Reports tab and click the red Cancel button for the mailing.

Name Your Zap
- Once your Zap is built, click at the top middle where it says "Untitled Zap" and rename it.
- At this point, if no further adjustments are needed you can go ahead and publish the Zap.
Questions? Open a Chat to Speak with a Member of Our Team.
Click Here to Schedule an Integration Appointment with Our Team