
Watch THIS VIDEO or review the written instructions below:
Step 1: Accessing the Integrations Page
-
Click on the hamburger menu in the top-left corner of your ProLine dashboard.
-
Scroll down and select "Integrations".
-
On the integrations page, locate SendJim on the second line and click its logo.
By default, the SendJim integration will be turned off until you authenticate with your account.
Enabling the Integration
-
Click "Enable Integration" to begin.
-
You’ll be redirected to SendJim’s login page.
-
Enter your SendJim username and password.
-
(Optional) Check “Remember me” for convenience.
-
SendJim will prompt you to grant access to ProLine. Click "Allow Access".
After permission is granted, you’ll be redirected back to ProLine where the integration setup will complete. If the integration is set up correctly, you’ll see a green checkmark in the top-right corner.

Management via Project Tags
Once integrated, you can exclude specific projects from using SendJim by referencing ProLine project tags.
Common Use Case:
Many users use this feature to stop automated review requests or other communications with homeowners that do not wish to be contacted with automations.
To do this:
-
Assign a tag to any project you want to exclude.
-
Blacklist is a common tag contractors use with ProLine.

-
Accessing the SendJim Campaign Step
You can add the SendJim step in two ways:
-
Editing an existing campaign: Open the campaign, scroll to the spot where you want to insert the step, and click the + (plus) button.
-
Building a new campaign: Add SendJim as one of your steps while creating the sequence.
When the new step is created, it will default to Disabled. Click the Disabled dropdown and scroll all the way to the bottom of the list to select SendJim.


Configuring the Step
Once you select SendJim, you’ll see the following options:

1. Delay Timer
Above the trigger box you will see a delay timer, this allows you to set a delay from one step to the next before that trigger starts. This can be a delay of:
-
Days
-
Hours
-
Minutes
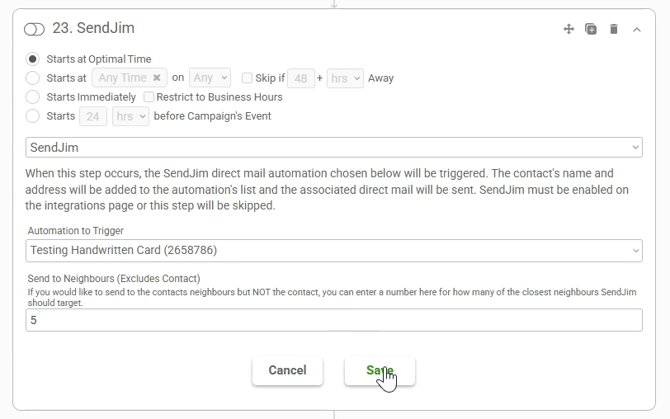
2. Start Time
At the top of the campaign step box, you will see options to choose when this action should run:
-
Starts at optimal time
-
Start at a specific time
-
You will choose a time of day and day of the week to send
-
Can check the “skip” option if there is a time constraint you want to be aware of.
-
-
Starts Immediately
-
Additional check box to restrict to business hours
-
-
Start “X” hours/minutes before a campaign’s event
3. SendJim Step
Below the timing controls, you’ll see a message explaining how this step works:
When this step runs, the SendJim direct mail automation you select will be triggered. The contact’s name and address will be sent to SendJim so the mail can be delivered. If SendJim isn’t enabled in your Integrations, this step will be skipped.
Once the integration is active, return to your campaign to finish setting up the step.
Additional SendJim Step Options
-
Automation to Trigger: Choose from the SendJim automations available in your linked account.
- Send to Neighbors: Enter a number of nearby homes to target in addition to or instead of the primary contact.
- Send to Client: If you do not enter a number of nearby homes to target it will default to mail to the individual who is triggering this mailing.
Saving & Using the Step
Once your settings are complete:
-
Click Save to confirm the step.
-
Review your campaign to ensure the SendJim step appears in the right spot.
-
Activate the campaign when ready.
CRM Settings in SendJim:
Set your monthly automated budget in your Billing and Membership section. These numbers are what SendJim will use to give Proline a budget to spend every month. Once these numbers are set, click "Save."

-
Enable Auto-Replenish: This is the number of additional credits that SendJim can purchase on your behalf if you have run out of available credits, but have not reached your monthly spending limit
-
Maximum Monthly Spending Limit: This is the maximum number of credits that Jobber can use to send automated mailings on your behalf during the calendar month.
Questions? Open a Chat to Speak with a Member of Our Team.