
Watch the video or follow the written instructions below to learn how to connect ServiceMonster and SendJim together as well as all the different ways you can send mailings through SendJim inside ServiceMonster.
How to Connect ServiceMonster and SendJim
-
On the ServiceMonster Home Page, Click "MarketPlace" from the left menu and find "SendJim" in the MarketPlace.

-
Select the "Configuration" Tab

-
Select "Grant Access to Your SendJim Account"
-
Select "Allow Access" from the pop-up
- If you are not currently logged into SendJim, this pop-up will ask you to log-in before allowing access
-
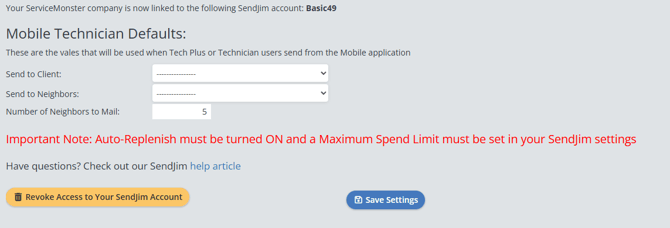
The Page will Automatically Refresh to Set-Up Mobile Automation
- If you do not want to set up automatic mailings based on mobile app tasks, you can skip this step.
- If you do want to set up automatic mailings, please fill in the drop boxes and select "Save Settings" to apply the mobile mailings automation
Finishing Set-Up Inside SendJim
CRM Settings in SendJim:
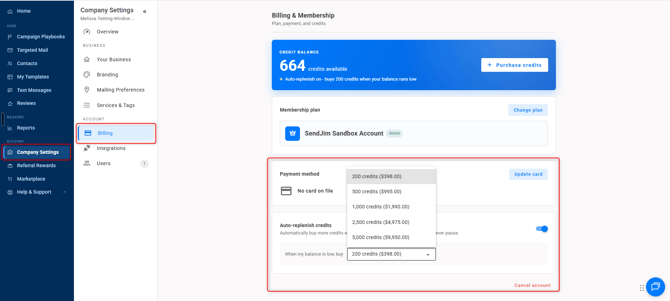
- This is the last and most important step. Navigate to your Company Settings along the left then select the Billing tab. Once in the Billing tab you'll want to turn on your Auto Replenish. There's a toggle button to turn it on easily.
- After that you'll want to go into your Integrations tab and set your Max Monthly Spending.
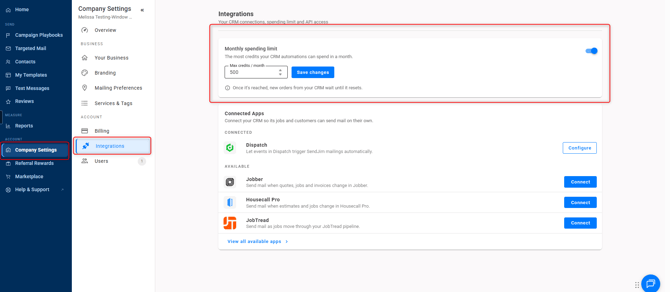
- These numbers are what SendJim will use to give your CRM a budget to spend every month. Once your CRM has reached your Max Monthly Spending limit inside of SendJim for that calendar month, SendJim will send you an email and stop any additional mailings from being triggered until the next calendar month. Or, you can choose to come in and increase your max spend to allow automation to continue.
Have any questions or need help with turning on the integration? Use the chat to contact our support team.